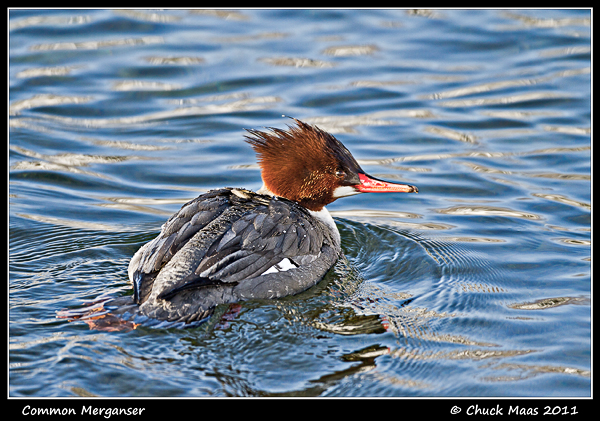
Winter birds. It’s definitely still winter here in Alaska even though the days are rapidly getting longer, and wild creatures keep right on taking care of the day-to-day business of survival. Late last week on a beautiful cold sunny day, I enjoyed watching some hardy waterfowl doing just that. On the back side of one of the nearby military bases there’s a long lake which at one point is crossed by a dirt road with a culvert connecting the upper and lower parts of the lake. The culvert is deep enough that water passing through it creates sufficient turbulence on the outlet side to sustain a small ice-free surface area. And since this lake is a salmon spawning destination, populations of fry attract diving birds to this spot.
On that afternoon a common goldeneye and two common mergansers were present. The goldeneye was a bit skittish, hanging back along the far edges of the opening, but the mergansers didn’t seem to mind my careful approach and soon were foraging close to the outlet of the culvert. They would work the current by swimming to the far edge of the open area and then gradually moving upstream while peering into the water with eyes submerged just below the surface. There seemed to be plenty of small food items, and occasionally one of the birds would dive deep and come up with a larger specimen (perhaps one of the stocked rainbow trout) and take some time to work its catch into position to swallow. The goldeneye seemed to be scoring too, so at least three birds were making out well in this cool winter environment.

Secondary tools. With the plethora of complex image-making tools now available to photographers, it’s easy to forget that actually making an image boils down to a pretty simple formula—a combination of aperture setting and shutter speed to control the amount of light reaching the sensor or film, and a lens focused on the intended subject. The fourth factor is ISO, the sensitivity setting for the sensor or film. ISO (or film speed) used to be static with a given film, but digital capture allows choices up and down the scale (either manually or in automated fashion). Admittedly, the modern processes for arriving at this seemingly simple set of parameters can be incredibly complex (think auto-exposure, autofocus, and auto-ISO), but the factors in the final equation haven’t changed.
As the capability of capture devices rises, so does the challenge to understand how they operate, the wisdom to select the best alternatives for a particular shooting circumstance, and ensuring your equipment is actually doing what you ask it to. That’s where the secondary market has exploded, whether it be training (in the form of an almost infinite variety of books, workshops, DVDs, videos, and online tutorials), or devices and programs to address specific functions. Here are some examples
Focus is a pretty important aspect of making a good photograph. One of the assumptions is that the camera and lens are performing properly and that what you see in the finder when you manually focus or what the camera/lens combination determines when you’re using autofocus is going to result in sharp focus on the intended subject. In real life this doesn’t always occur. There are lots of reasons for this, but it becomes especially obvious in those circumstances when depth of field is limited—as in a large sensor behind long lenses. While current autofocus systems are very good, there are times when a particular combination of camera/lens either focuses slightly in front of or behind the subject. In the past, if you determined this to be a problem, you had to send the combo to a repair facility to have it calibrated. Now many upper-end DSLRs let you adjust the autofocus yourself. While this isn’t rocket science, there are a number of variables that will affect the outcome, and entrepreneurs have developed tools like LensAlign and SpyderLENSCAL to help you with the process. Nor do you have to spend a lot of money for better accuracy; several sources offer free products and methods including Keith Cooper and others.
Do you really need to go to all this trouble? Only if you demand the most of your equipment and seek the highest quality results. Lack of image sharpness can have many causes, but improper focus is one of the main culprits. If you need a peek at why proper focus may not be as easy as it seems, bring up the online Depth of Field Calculator and put in some common parameters…say Canon 60D+500mm lens at f/5.6 focused at 100” and you wind up with just over 2.5’ total depth of field (and some would argue that’s optimistic depending on how you define circle of confusion, etc.). Not much room for error, and a very good reason to have fine-tuned your equipment to the best of your ability.
With the burgeoning integration of mobile electronic devices, more secondary photographic tools keep cropping up as well. One of the latest is called pCAM Film + Digital Calculator. This is an iPhone/iPad application with a huge array of functions, including depth of field and field of view calculators, and is aimed at both still photographers and filmmakers. It’s no cheap—$29.99—but it’s reputed to be of excellent quality and professionally useful. Outback Photo has a good review here.
So the tools are everywhere. All you have to do is pick the right ones and use them creatively to make your job easier and expand your capabilities. Good choosing.
